Abstract blue data network
Article

Microsoft Fabric: Data pipelines part 2

Fabric pipeline metadata driven framework

In part one of this blog series, we explored how data factory pipelines can ingest data into a lakehouse, serve as an orchestration tool for invoking nested pipelines and notebooks, and how to automate your pipelines with an attached schedule.

In part two of this blog series, we will reveal some options for configuring a metadata driven framework to increase efficiency in data factory pipelines.

Fabric pipeline variables

Building off the demo pipeline used in part one of this blog series, we will now introduce the concept of variables combined with a “ForEach” activity into our pipeline process.

Set variable

  1. To create a variable, navigate to your pipeline created in part 1 of this series. In this example the pipeline, PL_DATA_Copy_Blob_LH_Demo, is used. Click on the “Variables” menu of the pipeline and create a new array variable.

Creating a new variable in your Microsoft Fabric pipeline

  • Name: SourceFolderName
  • Type: Array
  • Default value: ["dimension_city","dimension_customer","dimension_date","dimension_employee","dimension_stock_item","fact_sale","fact_sale_1y_full"]

2. After creating the array variable, navigate to the “Activities” tab to add a “Set variable” activity into your pipeline.

Adding a set variable activity to your Microsoft Fabric pipeline

3. In the “Settings”, define your variable value. They should look like this:

  • Variable type: Pipeline variable
  • Name: Variable name
  • Value: ["dimension_city","dimension_customer","dimension_date","dimension_employee","dimension_stock_item","fact_sale","fact_sale_1y_full"]

ForEach activity

4. Now that the array variable is configured, we will add a “ForEach” activity into the pipeline so that it can loop through each folder name in the array variable. Since the goal is to loop through each source folder, we are copying from blob storage into our lakehouse. You will then cut your “Copy data” activity and paste it in your “ForEach” activity. You can do this by using the keyboard shortcuts ctrl + x and ctrl + v directly in the pipeline UI.

Adding a ForEach activity to your Microsoft Fabric pipeline

5. Next you will configure your items property in the “ForEach” activity. Clicking on “Add dynamic content” in the item’s property will open the pipeline expression builder where you will define what items get passed through the “ForEach” activity. We will use the array variable defined in the previous steps.

a. The additional properties, Sequential and Batch count, can be left with the default values of unchecked and blank. Setting a sequential order may be required if you need a specific order of operations in your “ForEach” activity. Batch count would explicitly define the number of parallel “ForEach” child activities that are running at once in your pipeline. Data factory pipelines are engineered to dynamically determine the correct batch count based on the required resources; however specific use cases may require this batch count property to be set for optimal performance.

Configuring your items property in the ForEach activity of your Microsoft Fabric pipeline

Items: @variables('SourceFolderName')

b. The last property you need to change is the “File path” in your “Copy data” activity, which is now nested in the “ForEach” activity. Originally, you had your “File path” configured to copy every folder in the file path you defined. Now, this needs to be adjusted to loop through each subfolder of files passed through in your item’s property.

Updating the file path in your copy data activity

Directory: @concat('WideWorldImportersDW/parquet/full/',item())

6. Next, save and run your pipeline. See the difference in output and confirm each value in the variable was executed as its own copy activity.

Check output settings to confirm variable was executed as its own copy activity, output and input settings for your “ForEach” activity. “ForEach” activity connected to data pipeline

Congratulations!

You have now successfully leveraged a variable to drive a metadata driven framework in your pipeline process. Continue this blog to see how that process can become more dynamic through using a metadata table.

Capture pipeline audit data

An important part of the data factory pipeline process is monitoring and auditing your pipeline processes. Luckily, data factory pipelines have some built in variables that allow for an easy capture of this audit data.

  1. Before capturing the audit data from our pipeline runs, we need to first establish a lakehouse table to store that data. Below are code snippets from a notebook that can be executed to create your audit_pipeline_run delta table:

Cell 1 - Spark configuration

spark.conf.set("spark.sql.parquet.vorder.enabled", "true")
spark.conf.set("spark.microsoft.delta.optimizeWrite.enabled", "true")
spark.conf.set("spark.microsoft.delta.optimizeWrite.binSize", "1073741824")

Cell 2 – Create delta table

from pyspark.sql.functions import *

from pyspark.sql.types import StructType, StructField, StringType, IntegerType, TimestampType, ArrayType

schema = StructType([
StructField("PipelineRunId", StringType()),
StructField("PipelineId", StringType()),
StructField("StartTimeUTC", StringType()),
StructField("EndTimeUTC", StringType()),
StructField("WorkspaceId", StringType()),
StructField("PipelineTriggerId", StringType()),
StructField("ParentPipelineRunId", StringType()),
StructField("PipelineCompletedSuccessfully", IntegerType()),
StructField("Process", StringType())
])

data = []

table_name = "audit_pipeline_run"

metadata_df = spark.createDataFrame(data=data, schema=schema)

metadata_df.write.mode("overwrite").option("overwriteSchema", "true").format("delta").save("Tables/" + table_name)

2. Next you will need to create a notebook that inserts and updates your audit record for each pipeline run. This notebook will be called in your data factory pipeline in a later step. Below are code snippets that you will need to save as a notebook in your Fabric workspace:

Cell 1 – Spark configuration

spark.conf.set("spark.sql.parquet.vorder.enabled", "true")
spark.conf.set("spark.microsoft.delta.optimizeWrite.enabled", "true")
spark.conf.set("spark.microsoft.delta.optimizeWrite.binSize", "1073741824")

Cell 2 – Parameter cell
Important: this cell needs to be toggled as a parameter cell in order to pass values between your notebook and a data factory pipeline.

PipelineRunId = "e3680a99-cb15-41dd-8d4e-2eb3c3e3a315"
PipelineId = "111fb227-7de7-482c-8afa-7277c912d46b"
StartTimeUTC = "8/1/2023 10:59:46"
EndTimeUTC = ""
WorkspaceId = "48cfb6f5-d490-432d-9c9b-42ed05108b4b"
PipelineTriggerId = "4561afd5-d561-641c-9d5b-42e56sa1df4b"
ParentPipelineRunId = "95651dfc6-e954-521c-9d65-6542s5df45b"
PipelineCompletedSuccessfully = 0
Process = "Copy blob storage tables to lakehouse files"

Parameter cell toggled to pass values between notebook and data factory pipeline

Cell 3 – Delta table merge statement to write pipeline audit data to lakehouse table

from pyspark.sql.functions import *

from pyspark.sql.types import StructType, StructField, StringType, IntegerType, TimestampType, ArrayType

from datetime import datetime

from delta.tables import *

schema = StructType([
StructField("PipelineRunId", StringType()),
StructField("PipelineId", StringType()),
StructField("StartTimeUTC", StringType()),
StructField("EndTimeUTC", StringType()),
StructField("WorkspaceId", StringType()),
StructField("PipelineTriggerId", StringType()),
StructField("ParentPipelineRunId", StringType()),
StructField("PipelineCompletedSuccessfully", IntegerType()),
StructField("Process", StringType())
])

source_data = [(PipelineRunId, PipelineId, StartTimeUTC, EndTimeUTC, WorkspaceId, PipelineTriggerId, ParentPipelineRunId, PipelineCompletedSuccessfully, Process)]

source_df = spark.createDataFrame(source_data, schema)

display(source_df)

target_delta = DeltaTable.forPath(spark, 'Tables/audit_pipeline_run')

(target_delta.alias('target') \
.merge(source_df.alias('source'), "source.PipelineRunId = target.PipelineRunId")
.whenMatchedUpdate(
set = {"target.EndTimeUTC": "source.EndTimeUTC", "target.PipelineCompletedSuccessfully": "source.PipelineCompletedSuccessfully"}
)
.whenNotMatchedInsert(
values = {
"target.PipelineRunId": "source.PipelineRunId",
"target.PipelineId": "source.PipelineId",
"target.StartTimeUTC": "source.StartTimeUTC",
"target.EndTimeUTC": "source.EndTimeUTC",
"target.WorkspaceId": "source.WorkspaceId",
"target.PipelineTriggerId": "source.PipelineTriggerId",
"target.ParentPipelineRunId": "source.ParentPipelineRunId",
"target.PipelineCompletedSuccessfully": "source.PipelineCompletedSuccessfully",
"target.Process": "source.Process"
})
.execute()
)

3. Once your notebook is created, head back to your data pipeline and add a “Notebook” activity. In the “Settings” menu of your notebook activity, first add your notebook in the dropdown menu. Next, configure the same parameters you defined in cell two of your notebook (see above). Define the parameter values in the expression builder.
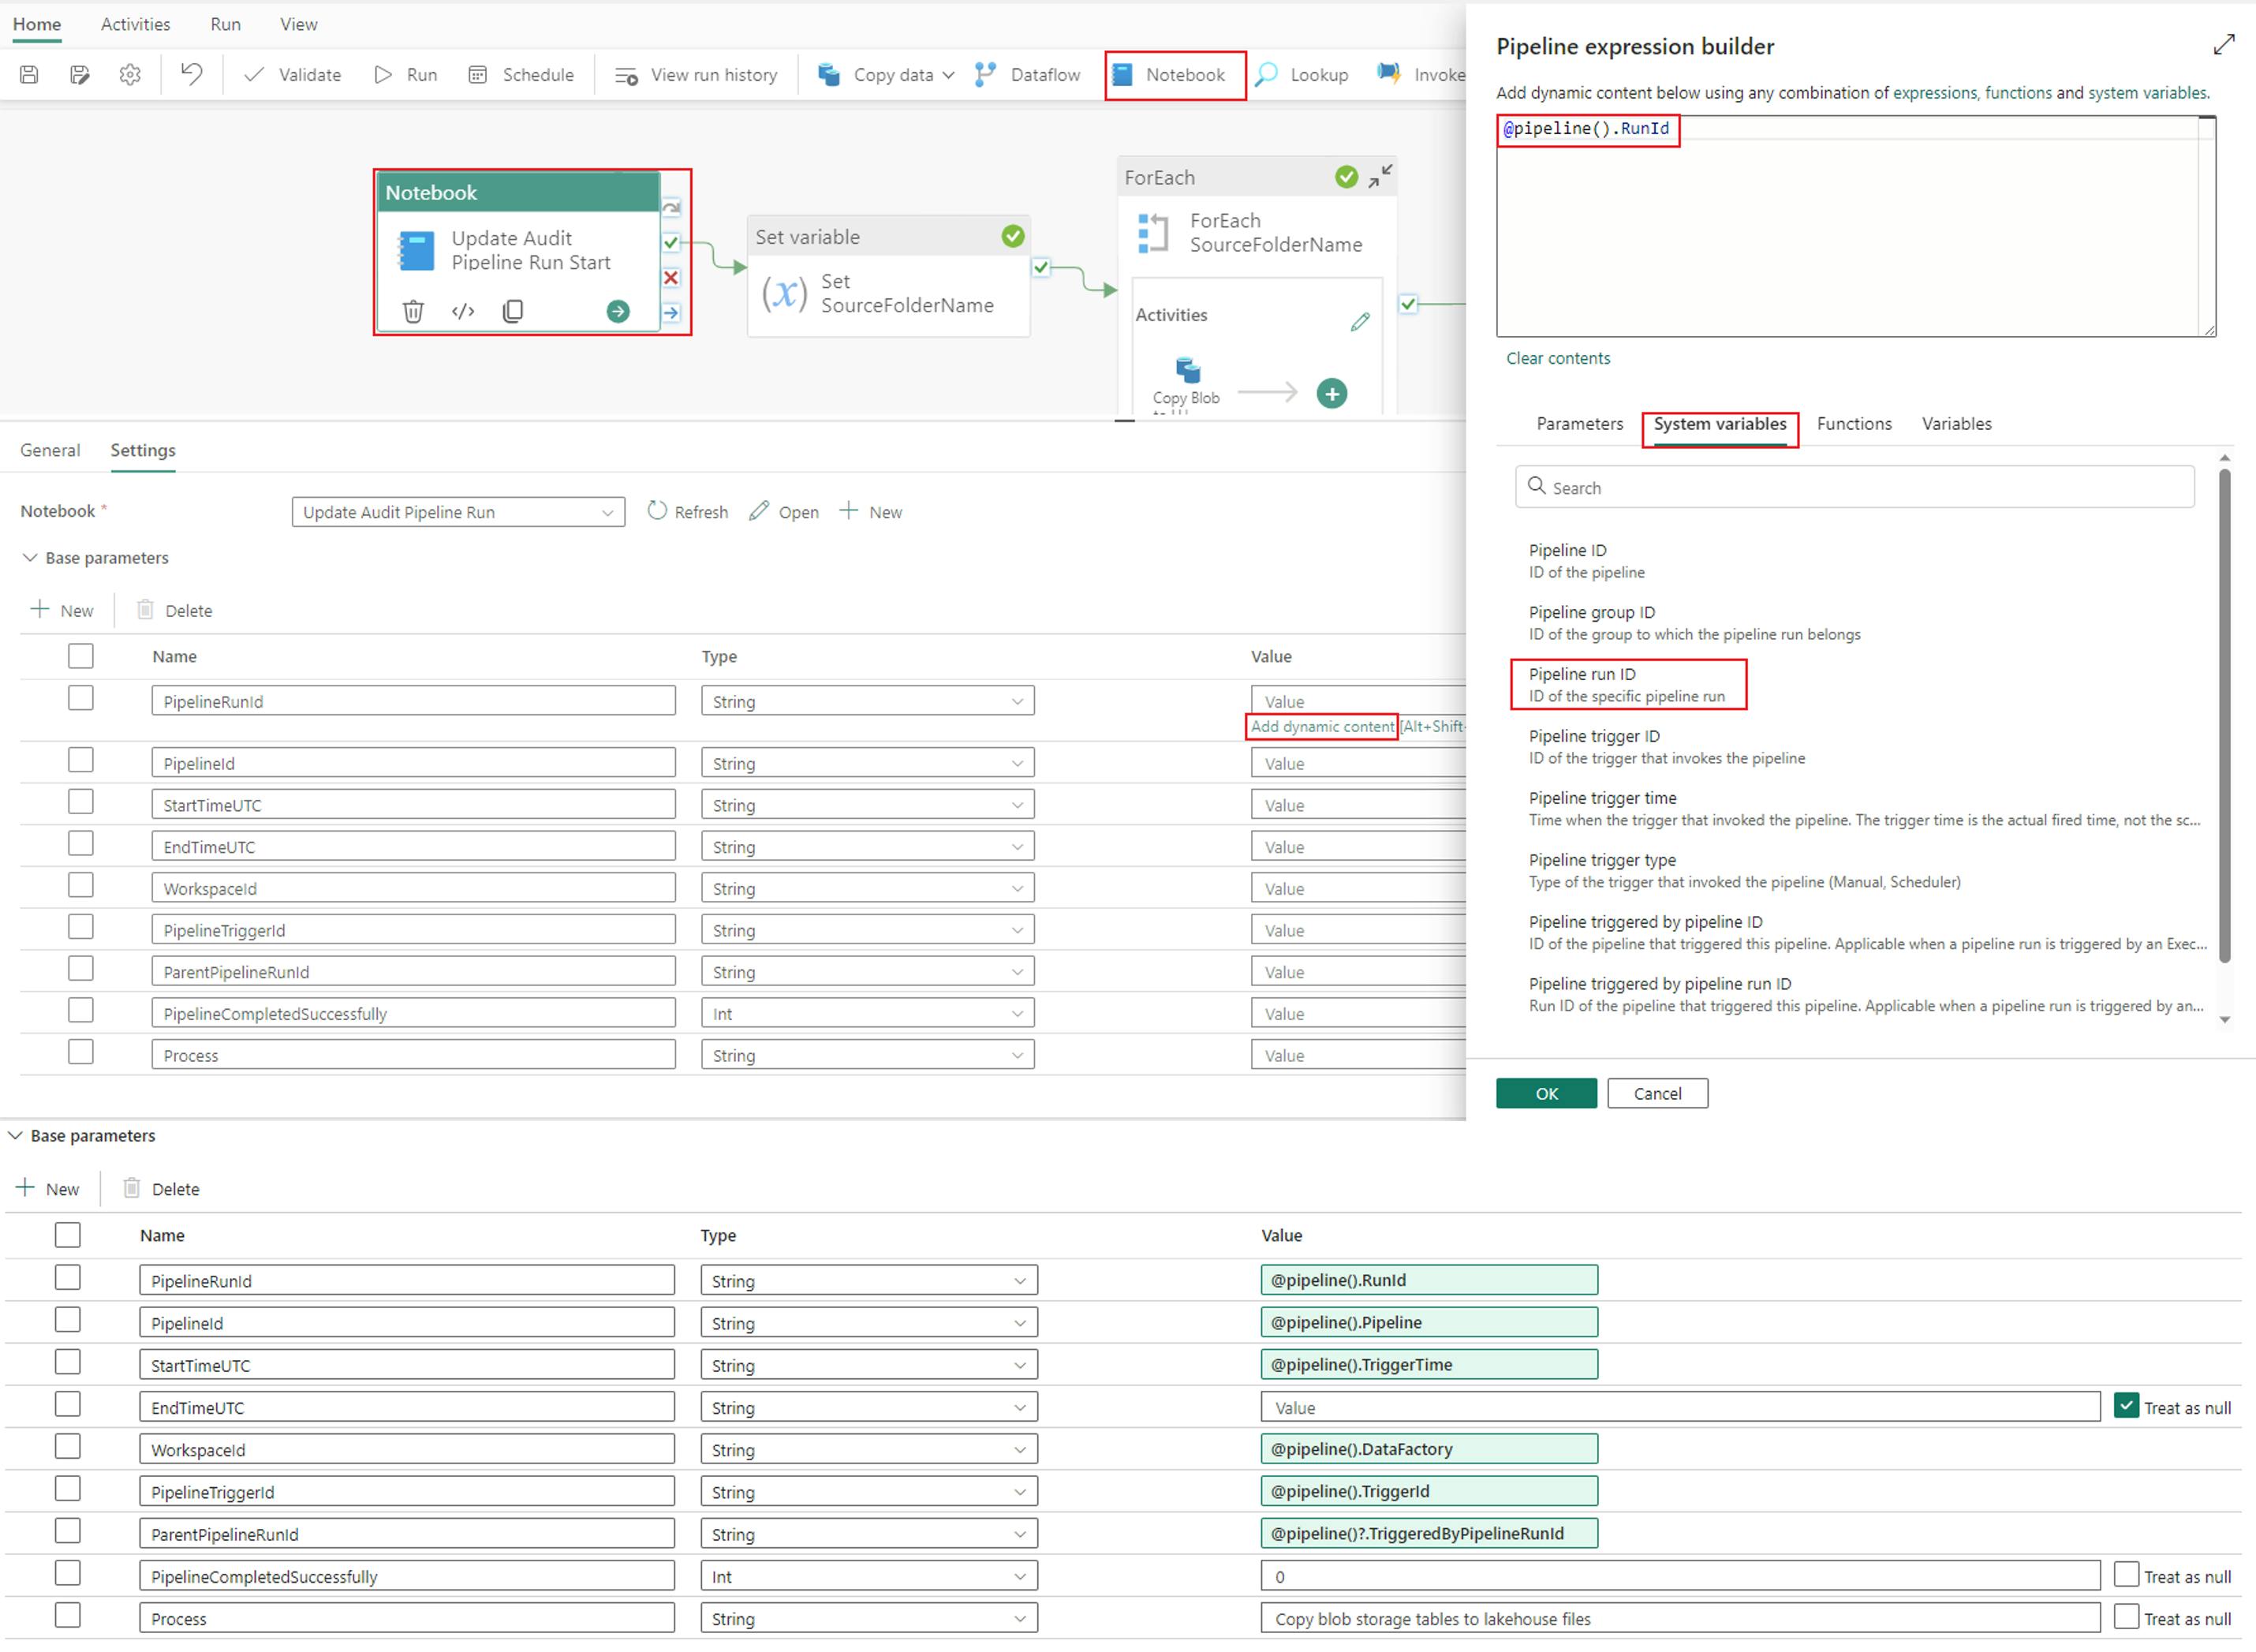
Adding a Notebook activity to your Microsoft fabric data pipeline and defining base parameter values in the expression builder of notebook activity

Base parameters:

  • PipelineRunId = @pipeline().RunId
  • PipelineId = @pipeline().Pipeline
  • StartTimeUTC = @pipeline().TriggerTime
  • EndTimeUTC = Treat as Null
  • WorkspaceId = @pipeline().DataFactory
  • PipelineTriggerId = @pipeline().TriggerId
  • ParentPipelineRunId = @pipeline()?.TriggeredByPipelineRunId
  • PipelineCompletedSuccessfully = 0
  • Process = Copy blob storage tables to lakehouse files

4. After configuring this “Notebook” activity, copy and paste it at the end of your pipeline. Update the EndTimeUTC and PipelineCompletedSuccessfully parameters to reflect a successful pipeline run.

Copy and paste Notebook activity to the end of your Microsoft Fabric pipeline

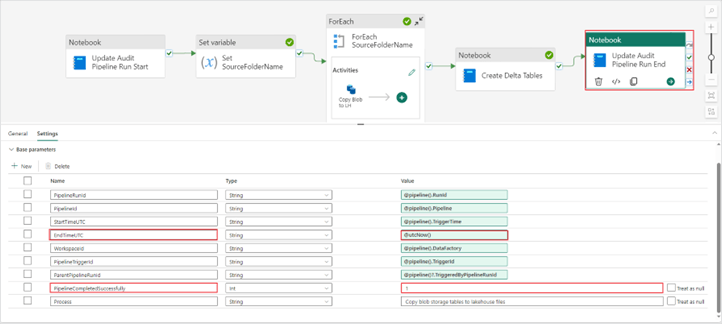
Base parameter changes:

  • EndTimeUTC = @utcNow()
  • PipelineCompletedSuccessfully = 1

5. Finally save and run your pipeline. Navigate to your audit_pipeline_run table in your lakehouse to confirm the pipeline run data has been captured correctly.

The table record should look like this after the first “Notebook” activity:

Notebook activity table record in Microsoft Fabric

The record should then be updated to record a successful run with an EndTimeUTC value if the pipeline run succeeds.

Successful pipeline run displays EndTimeUTC value

Create and leverage metadata framework

Continuing on the concept of using a metadata framework for our data factory pipelines, we will now demonstrate how to leverage a lakehouse table to drive our pipeline process.

  1. First, you need to create a metadata table in your lakehouse. You will achieve this through a Fabric notebook. Below are the code snippets to execute in a notebook to create your lakehouse delta table:

Cell 1 – Spark configuration

spark.conf.set("spark.sql.parquet.vorder.enabled", "true")
spark.conf.set("spark.microsoft.delta.optimizeWrite.enabled", "true")
spark.conf.set("spark.microsoft.delta.optimizeWrite.binSize", "1073741824")

Cell 2 – Create delta table with data

from pyspark.sql.functions import *

from pyspark.sql.types import StructType, StructField, StringType, IntegerType, ArrayType

schema = StructType([
StructField("fileName", StringType()),
StructField("batch", IntegerType()),
StructField("active", IntegerType())
])

data = [{"fileName": "dimension_city", "batch": 1, "active": 1},
{"fileName": "dimension_customer", "batch": 1, "active": 1},
{"fileName": "dimension_date", "batch": 1, "active": 1},
{"fileName": "dimension_employee", "batch": 1, "active": 1},
{"fileName": "dimension_stock_item", "batch": 1, "active": 1},
{"fileName": "fact_sale", "batch": 2, "active": 1},
{"fileName": "fact_sale_1y_full", "batch": 2, "active": 1}]

table_name = "metadata_source_table"

metadata_df = spark.createDataFrame(data=data, schema=schema)

metadata_df.write.mode("overwrite").option("overwriteSchema", "true").format("delta").save("Tables/" + table_name)

After executing the notebook code, your metadata table should look like this:

Metadata source table for Microsoft fabric data pipeline

2. Next you will build on your existing data pipeline and add a “Lookup” activity. This activity should be placed in between the “Notebook” and “Set variable” activities in the pipeline.

Adding a Lookup activity to your Microsoft Fabric data pipeline

3. In the “Settings” menu of the lookup activity, configure the properties. Notice the preview data option to ensure you are returning the records from your metadata data.

Configure properties in the Settings menu of the lookup activity

  • Data store type: Workspace
  • Workspace data store type: Lakehouse
  • Lakehouse: Lakehouse name
  • Root folder: Tables
  • Table name: Table name
  • First row only: Unchecked

4. Previously we showed how you could explicitly set your variable value in a pipeline. Now you want to change the variable definition to use the returned value from your metadata table in your lookup activity.

Changing the variable definition to use the returned value from your metadata table in your lookup activity

Value: @activity('Lookup Metadata Table').output.value

5. Your last configuration changes are going to be in the “ForEach” activity where you need to specify which column in the multi-column array you want to use in your child “Copy data” activity. You want to specify the “fileName” column from the array to use in your “File path” directory property.

specify which column you want to use in your child Copy data activity in the ForEach activity

Directory: @concat('WideWorldImportersDW/parquet/full/',item().fileName)

6. Now save and run your pipeline to test your results. Notice the difference in the data passed through to the variable compared to the earlier results of hardcoding the variable. Three columns of data are now stored in the array variable compared to just one used before.

save and run your pipeline to test results, output settings for metadata framework. With a metadata framework, three columns of data are now stored in the array variable

Hopefully this example shows the value in creating your data factory pipelines around a metadata framework. Continue on for a final tutorial on how you can filter and batch your table loads ending with an efficient and well-architected pipeline process.

Filter and batch tables

Wouldn’t it be nice to use the same metadata table created in the previous example to batch the table loads? For example, load our dimension type tables in batch 1 and our fact tables in batch 2. This section will show you how to do just that in data factory pipelines.

  1. The first step is to add a “Filter activity” to your pipeline. Place this activity between the “Set variable” and “ForEach” activities.

Adding a Filter activity to your Microsoft data pipeline

2. Next configure the “Filter activity” settings.

configuring the filter activity settings in your Microsoft data pipeline

Items: @variables('SourceFolderName')

Condition: @equals(item().batch, 1)

3. Now you need to update the “ForEach” items property to use the output from the “Filter activity” instead of the “Set variable activity”.

Updating the ForEach activity in your Microsoft data pipeline

4. Next you need to add in your batch 2 tables. To do this easily, copy the “Filter” and “ForEach” activities and paste them in the pipeline. Your pipeline should now look like this:

Adding in batch 2 tables in your Microsoft data pipeline

5. Update your second set of “Filter” and “ForEach” activities to filter for batch 2 tables.

Accessing Filter and ForEach activities setting to filter for batch 2 tables in your Microsoft data pipeline. Updating your second set of Filter and ForEach activities to filter for batch 2 tables

Update your second set of “Filter” and “ForEach” activities to filter for batch 2 tables

6. Finally, save and run your pipeline. Notice the different metadata passed through for batch 1 and batch 2, and the corresponding “ForEach” child activities that are run for each batch section.

View metadata passing through for batch 1 and batch 2 tables and finalizing filter and batch data for data pipelines

Congratulations!

You have now successfully learned a few ways to architect a metadata driven framework in Fabric pipelines. Thank you for reading our Fabric Data Factory pipeline series. Stay tuned for more great Fabric content from our Baker Tilly Digital professionals!

Interested in more Microsoft Fabric training videos? Check out the full line-up here!

Chris Wagner
Director
silhouette of people talking, meeting
Next up

Private equity dealmaking in the middle market: A surprising resilience